In this article, you will learn about email blacklists, common reasons for getting onto the list of blocked senders, and how to request blacklist removal.
How to remove your IP or domain from a blacklist
- Step 1: Run a blacklist check
- Step 2: Address the reason for blacklisting
- Step 3: Request blacklist removal
- Step 4: Prevent blacklisting in the future
An email blacklist is a list of domains and IP addresses suspected of sending spam.
Blacklists share data with email service providers letting them to block or filter out emails from suspicious senders, reducing spam from being delivered to recipients.
However, the blacklisting algorithm is not perfect and you may end up getting listed even for minor issues, like using a spam trigger word.
What happens after being blacklisted
If you end up on a popular blacklist, that info spreads to email service providers, and here's what happens:
- Your emails from the domain get blocked by spam filters or just rejected. Not cool!
- Your deliverability decreases, and your campaign engagement goes down.
If you keep sending campaigns without fixing the problem, your sender reputation will take a hit, and you might end up getting permanently blocked.
Don't worry, though! Follow the troubleshooting steps below to handle the possible blacklisting situation.
How to remove your IP or domain from a blacklist
If you get many undelivered emails with errors like "550 5.7.511 Access denied, banned sender[xxx.xxx.xxx.xxx]" or notice a sudden drop in your campaign results, it might be a sign that you should run a blacklist check.
Step 1: Run a blacklist check
The easiest and quickest way to check for blacklisting is by using monitoring tools like MXToolBox or MultiRBL. These tools will test your IP address or domain against dozens of email blacklists.
To run a quick blacklist check:
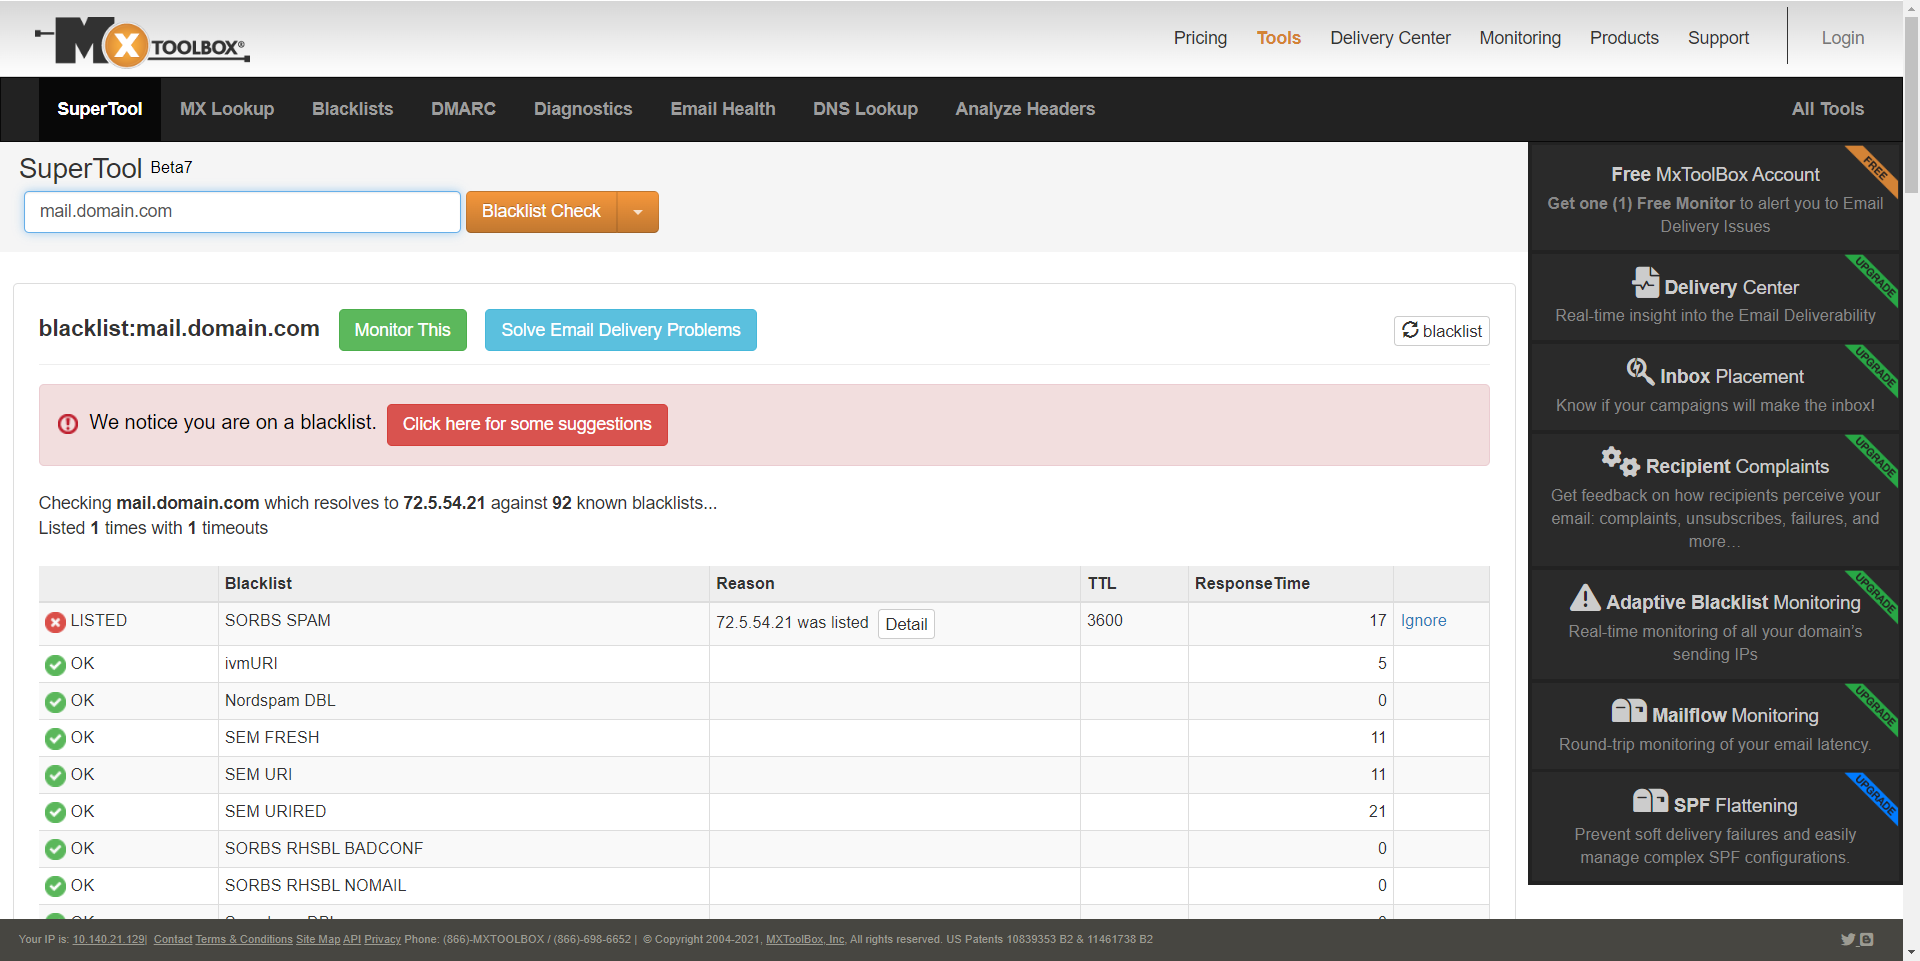
Go to the MXToolbox website --> Enter your IP address or domain name --> Click Blacklist Check.
Next, review the results.
If your IP address or domain is blacklisted, you'll see a "LISTED" status at the top.
To check the possible reason for the listing, check the information in the "Reason" column.
Step 2: Address the reason for blacklisting and other potential issues
Before proceeding with the blacklist removal, make sure to address the reasons for being listed.
If you don’t address the issues, it will be harder to support your delisting request. Major blacklists like Spamhaus require you to describe what action you took to solve the issue when you request delisting.
There are a few major reasons for being blacklisted:
- High complaint rates: If recipients frequently mark your emails as spam or report them, it can lead to blacklisting.
- Inactive or unengaged recipients: Sending emails to inactive or unengaged recipients can negatively impact your reputation and potentially lead to blacklisting.
Learn best practices and insights to improve the response rate of your campaigns →
- Incorrect domain configuration: Misconfigured DNS settings or missing email authentication may lead to blacklisting.
Read the guide on improving deliverability with DNS records -->
Here are the guides to help you authenticate emails with SPF, DKIM, DMARC →
- Inconsistent sending patterns: Sudden increase in email sending volume without preparation can result in blacklisting.
Step 3: Request blacklist removal
Most blacklists automatically remove you after a while if your emails don't receive any further spam reports, but some influential ones require you to contact them for manual delisting.
It's best to reach out to them promptly for this purpose.
Below are short guidelines on what to do when you find your domain or IP address listed on one of the popular blacklists.
# Steps to request removal from Barracuda blacklist:
Go to the Barracuda Removal Request Page.
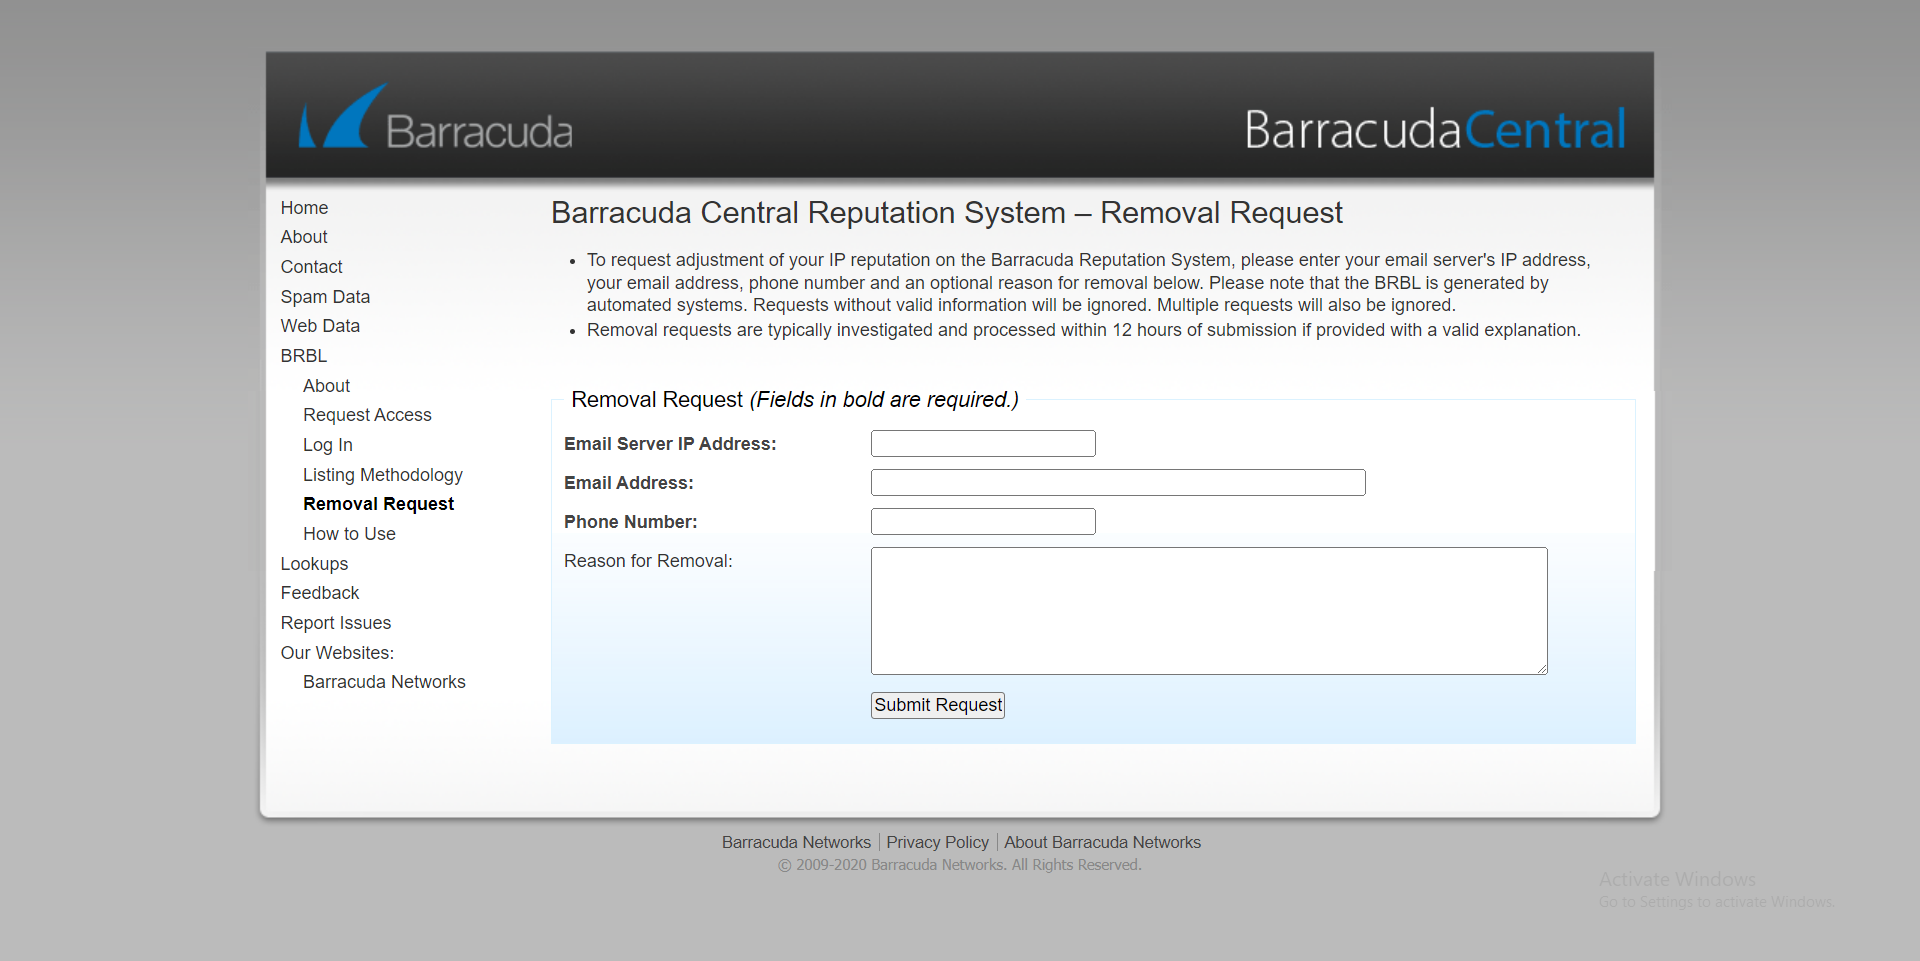
Fill out the required information: your email server’s IP address, email address and your phone number.
In the Reason for removal area, describe the issue and ask to be removed from a list. To support your request, provide a list of steps you’ve taken to fix the issue.
You can mention that “I’ve configured SPF and DKIM in my DNS” or “Now I use double-opt in scenario to get clear consent from my recipients”.
If you provide a valid explanation, removal requests are usually processed within 12 hours from submission.
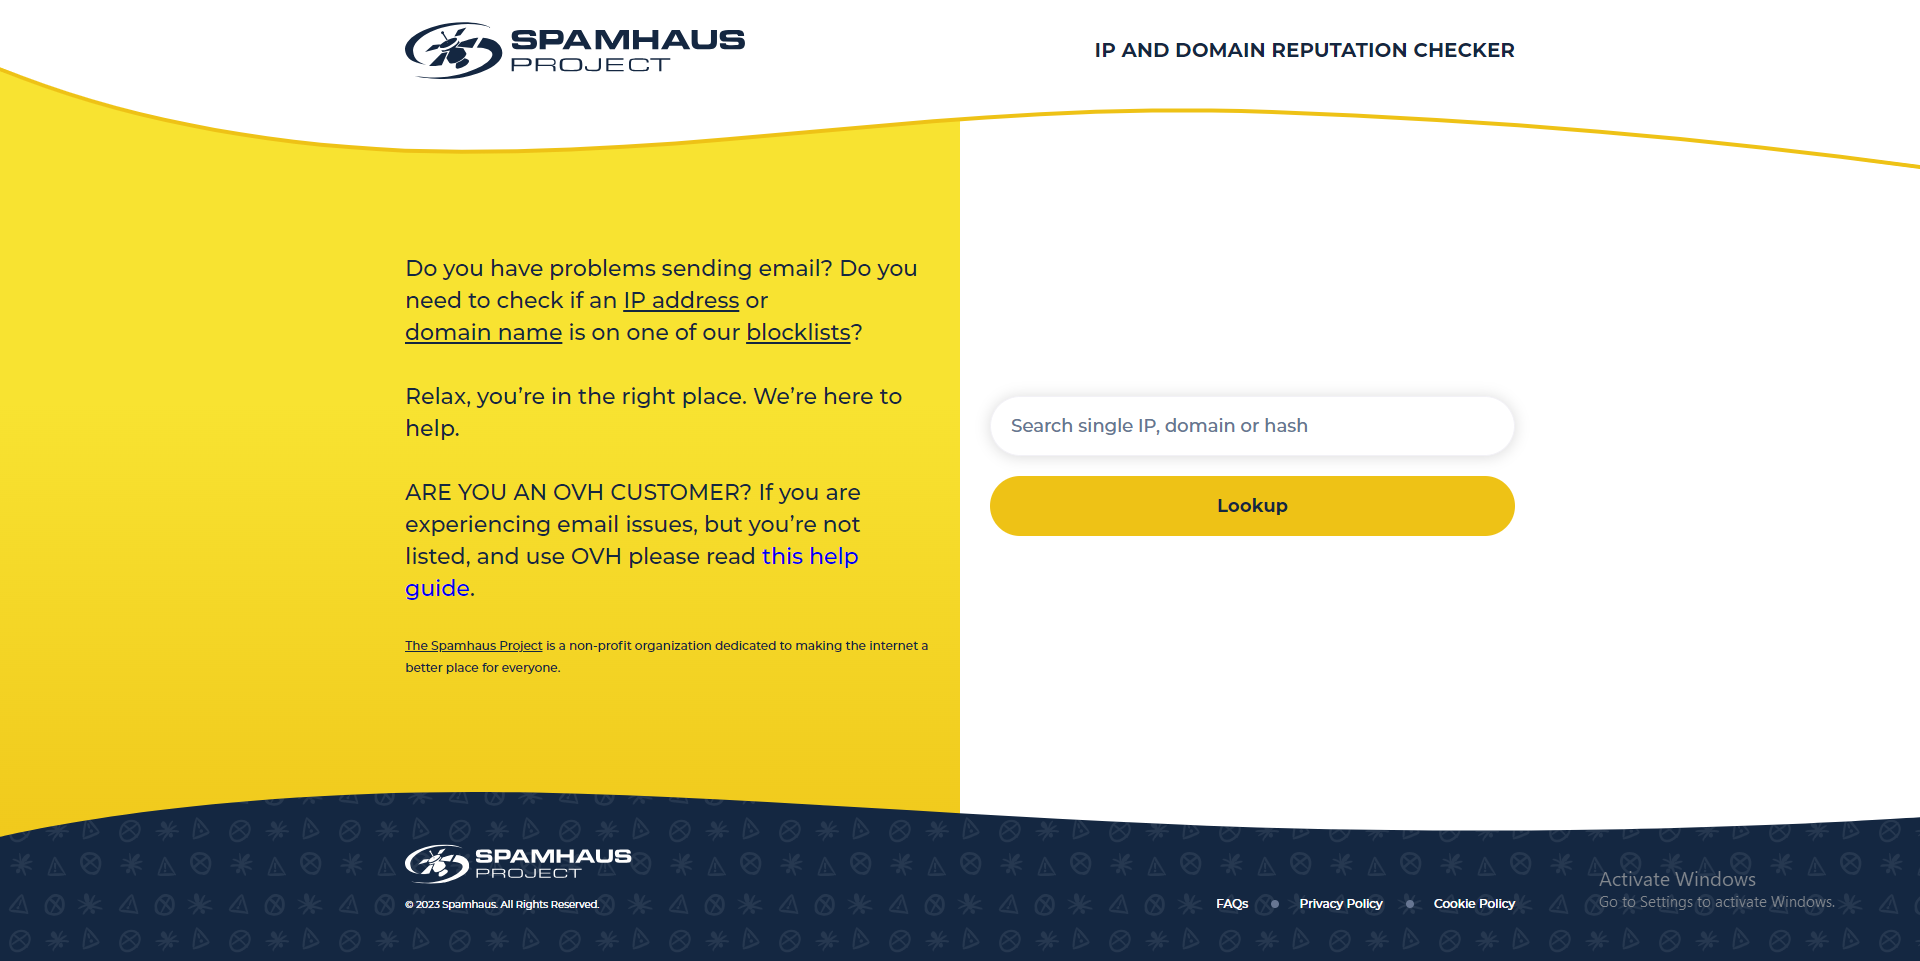
# Steps to request removal from Spamhaus blacklist:
Go to IP and domain lookup page.
Enter your IP address or domain name.
Fill out and submit a removal request. Explain what caused the spam issue, how you resolved it, and the steps you’ve taken to prevent it in the future.
# Steps to request removal from Microsoft blacklist:
To remove yourself from the internal blocked senders list in Microsoft:
Send an email to delist@messaging.microsoft.com and include a non-delivery report and your IP address.
Learn more on how to use the delist portal in this Microsoft guideline.
Step 4: Take actions to prevent blacklisting in the future
The more often you get on the blacklist, the more challenging it will be to delist and restore your sender reputation.
Make sure to follow email best practices when sending campaigns to minimize the risks of being blacklisted again.
# Set up email authentication and DNS settings
Make sure your domain configuration for sending emails is fully complete.
# Warm up accounts and be consistent in sending volume
If you suddenly start sending hundreds of emails per day without prior consistent activity or preparation, you are more likely to get blocked.
Email warm-up helps in gradually increasing your sending volume to prevent triggering spam filters.
# Test your email deliverability before sending campaigns
Test email placement with Glock Apps or other similar services to find potential issues.
Testing the email content and placement before actually sending will help you identify what is causing the issues (links, images, text, sending email/domain, etc.) and fix them.
Read next:
Among other things, blacklists collect data from spam filters. You should aim at avoiding spam filters and reducing your spam complaint rate as your go-to strategies.
For more tips and advice, read the guide on how to avoid spam filters →


Sorry about that 😢
How can we improve it?