Ever found yourself needing to send an email to a large group of people without disclosing their email addresses to each other?
Or perhaps wished to personalize your message for each recipient without investing too much time and effort?
You’re not alone.
We all often need to dispatch emails to multiple recipients ͏individually for various reasons, such as sales, marketing, recruitment, or me͏mbership activities. But doing this manual͏ly can be tedious and error-risky. Lucky for us, smart solutions exist to help you send and track emails to multiple ͏recipients separately with ease and efficiency.
In this guide, we’ll show you how to use ͏Gmail and some of the best email tools of 2024 to send personalized emails in bulk. We’ll also weigh in on the pros and cons of each method, alongside some tips and best practices to make your mass email campaigns more successful.
Outline:
- What does sending emails to multiple people entail?
- Why is sending emails to multiple recipients beneficial?
- Why you might need to hide recipients in a mass email
- How to send an email to multiple recipients individually in Gmail
- Potential hiccups when using the BCC method in Gmail
- How to send emails to multiple recipients using third-party tools
What does sending emails to multiple people entail?
Sending an email to multiple recipients is about spreading the same message to a crowd. There are several ways to do this in Gmail:
- Direct Multiple Addressing: This involves adding all the email addresses in the ‘To’ field.
- CC (Carbon Copy): This is typically used to include recipients for informational purposes, where a response isn’t necessarily expected.
- BCC (Blind Carbon Copy): This feature is for sending emails where each recipient’s address is hidden from all other BCC recipients.
These methods come with their own set of limitations and drawbacks, like lack of personalization, spamming risks, and the headache of tracking and managing responses. Using email automation tools like Snov.io gives you more flexibility in communication with your recipients. We’ll explore this further in a bit.
Why is sending emails to multiple recipients beneficial?
Sendin͏g emails to a broader audience can offer numerous benefits for your business or personal goals.͏ Here’s the lowdown:
- Broad reach: With minimal effort and cost, you can reach a large audience. Whether promoting products or services, sharing news or updates, inviting people to an event, or simply staying in touch, email is your effective and reliable communication channel.
- Building trust and loyalty: By sending emails to multiple recipients separately, you can show them you care about them and value their relationship. Email automation tools help you measure the performance of your emails and optimize them for better results.
- Enhanced conversions and sales: Sending emails to multiple recipients separa͏tely can help dodge landing in a spam folder, improving the deliverability and open rates of your emails, which in turn can boost conversions and sales.
Why you might need to hide recipients in a mass email
Keeping recipients under wraps in a mass email is a common practice for ethical and practical reasons. Here’s why you might want to consider doing it:
- Privacy concerns: The primary reason is to respect your recipients’ privacy. Spilling everyone’s email addresses can lead to an unintended sharing of personal or professional contact details.
- Professionalism: When sending official or business emails, a clean, uncluttered look is part of the professional etiquette. Displaying a long list of recipients can appear messy and may give an impression of carelessness.
- Avoiding “Reply All” chaos: If the recipients are openly listed, there’s a chance one of them might hit “Reply All” instead of “Reply,” leading to every person on the list receiving their response. This could trigger an overwhelming number of unwanted emails for everyone involved.
- Preventing spam: Exposing multiple email addresses can increase the risk of those addresses being snagged for spamming or other unsolicited communications.
- Avoiding distractions: When you send an email to a person, and they see numerous other recipients, the message might lose its personal touch, and they may not give it the due attention. Keeping the recipients hidden can make the message feel more tailored, holding the recipient’s focus on the content.
- Competitive environments: In business scenarios, you might be reaching out to various suppliers, vendors, or partners about potential deals or collabs. Unveiling everyone you’re communicating with can be counterproductive in competitive situations.
- Regulatory and compliance reasons: In certain industries, there are strict guidelines about sharing info, including contact details. Hiding the recipients ensures compliance with such regulations. Moreover, aligning with frameworks like SOC 2, ISO 27001, PCI DSS, etc., provides a holistic approach to information security, ensuring adherence to industry standards and bolstering overall data protection measures.
- Enhancing email deliverability: Some email servers are wary of emails sent to a large number of recipients, a common spam signal. By using BCC, you reduce the visible recipient count, which might help in avoiding being flagged as potential spam.
- Avoiding accidental exclusions: When you’re manually crafting a message to a long contact list, there’s a risk you might forget someone. Using a hidden list ensures you always have a predefined group, reducing the risk of accidental exclusions.
As you see, it’s always a wise idea to use the BCC method when sending mass emails from Gmail unless there’s a specific reason to share the list with all the parties involved.
How to send an email to multiple recipients individually in Gmail
Gmail’s interface, well known for its user-friendliness, makes this task simple. Let’s dive in:
1. Kick things off
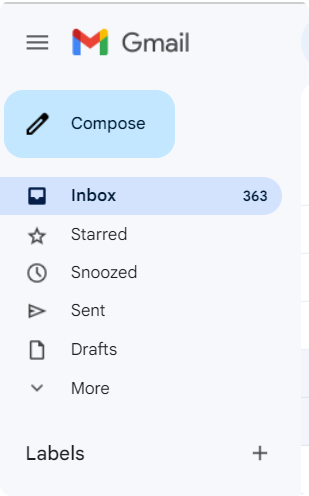
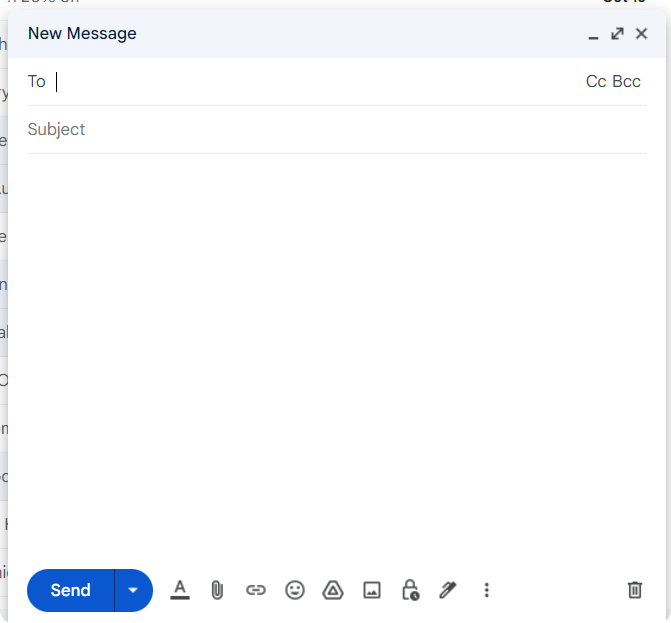
Log into your Gmail account. Up in the top left corner, you’ll find the ‘Compose’ button; give it a click, and a new message window will pop right open.
2. Write your message
Time to write that email. Be concise and clear, and make sure your content is universally relevant to all recipients.
3. Use the BCC method
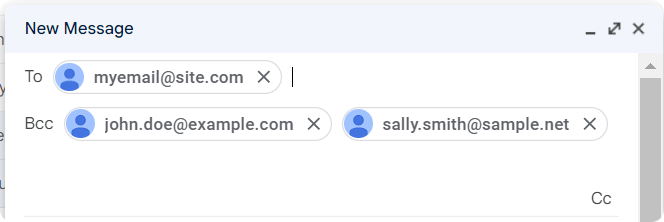
Right next to the ‘To’ field in your Gmail, you’ll find two other options: ‘CC’ and ‘BCC’. Go ahead and click ‘BCC’.
4. Fill in the BCC fields
Here’s where you enter the recipients’ email addresses. Just a heads-up: recipients will only see their own email addresses and will remain unaware of other recipients.
|
A little pro tip! Slip your own email address into the ‘To’ field so it doesn’t remain blank. Even though it can technically be empty when sending, it’s a common practice to put your own email address there and then add all other recipients to the ‘BCC’ field. This way, the recipients only see your address in the ‘To’ field and none of the other addresses. |
5. Hit the “Send” button
After careful proofreading and ensuring everything is in order, click ‘Send.’ This final step shoots your message out to the intended recipients without any delays.
Potential hiccups when using the BCC method in Gmail
While BCC is invaluable, there are potential pitfalls:
- Spam filters: Sending too many BCC emails can trigger spam filters, especially if a bunch of recipients mark your emails as spam.
- Lack of personalization: BCC emails tend to be one-size-fits-all, which might not engage the reader as a personalized email would.
- Limited features: Unlike specialized email marketing tools, Gmail has limitations on scheduling, tracking, and more when using BCC.
So, while using the BCC field in Gmail is a solid move, it might not be the best way to send emails to multiple recipients individually. It could have negative effects on your reputation, relationships, and results.
Stick around, as in the next section, we’ll explore some alternative methods and tools that can help you send personalized emails to multiple recipients separately and safely.
How to send emails to multiple recipients using third-party tools
One fantastic way to dispatch emails to multiple recipien͏ts individually is by using third-party tools that can automate and personalize your email campaigns. The market’s bustling with tools ready to help you with this task, but one of the most popular and powerful ones is Snov.io. It’s your all-in-one͏ sales automation platform offering a wide range of features like an Email Finder, Email Verifier, Email Warm-up, Drip Campaigns, sales CRM, and a lot more.
Snov.io and similar platforms offer a suite of features that Gmail doesn’t:
- Privacy: Your recipients’ addresses are always hidden.
- Detailed reports: Get insights into email opens, link clicks, and the works.
- Dodging spam folders: They ensure compliance with email regulations, minimizing the spam risk.
- Segmentation and personalization: Tailor-make your emails for different audience segments.
- Templates: Get access to a wide range of professional email templates.
- Automation: Set up your sequences and let the platform handle the rest, including follow-ups.
- Support: Expert assistance is just a shout-away, round the clock.
|
With the popular email marketing services and outreach platforms in your arsenal, you can: ✓ Segment your audience and send them messages that hit home, aligning with their interests and needs. ✓ Keep the conversations going with follow-ups, nurturing your recipients till they take the desired action. ✓ Add calls to action, attachments, images, videos, or other elements that can enhance your message and persuade your recipients to take action. ✓ Play around with different versions of your emails to find out what works best for your audience. |
Let us show you how to use Snov.io to send personal͏ized emails to multiple recipients at once.
1. Sign up for Snov.io
The first step here is to sign up for a free account. Just slide over to https://snov.io and click the “Sign Up” button. You’ll need to enter your name, email address, password, and phone number (or you can just sign up with Google!).
If you chose the first option, wait for a confirmation email to land in your inbox and click the activation link. Once done, you’ll be able to access the Snov.io dashboard and start using the tools.
2. Create a sequence
Now, onto crafting a sequence—a series of emails that you want to send to your recipients in a specific order and time interval.
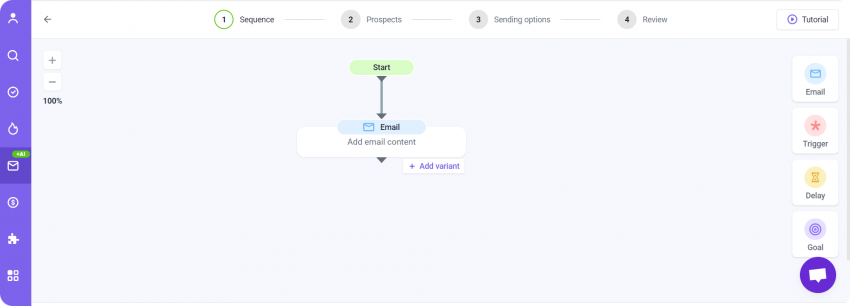
Start by clicking the “Drip Campaigns” tab in the left ͏sidebar͏ and then hit the “New Campaign” button. A visual editor will unfold before you, where you can let your creativity roam free in designing your sequence.
3. Compose your email
The next step is to compose your email. Drag an “Email” element from the right panel and drop it into the editor. You’ll need to craft a catchy subject line and enter the sender’s name along with the sender’s email address.
Using templates, variables, or placeholders will help you customize your email for each recipient based on their data from a spreadsheet or a CRM system. For example, use {{Name}} to insert the recipient͏’s name or {{Company}} to insert their company name.

4. Add prospects
Now, let’s add prospects—the people you want to send your emails to.͏ In the “Prospects” tab, you’ll have an opportunity to add a list of recipients.
Whether you’ve got an existing list or are starting fresh, you’re covered. Got a list of prospects in a CSV or XLS file? Upload it straight from your computer. If you have a list of prospects in a CRM system like HubSpot or Sales͏force, you can import it directly from there.
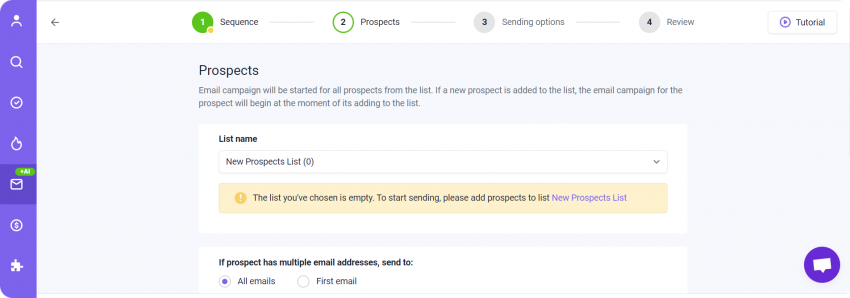
No list of prospects? You can use Snov.io Email Finder to find and collect pre-verified leads that match your ideal customer profile.
5. Send a test email
In the Sending options, choose your sender account or add a new one. Snov.io supports SMTP, Gmail, Exchange, and Outlook accounts.
Before sending emails to your prospects list, it’s recommended to send a test email. This step allows you to check how your email looks and works before hitting the stage with real recipients.
6. Schedule your campaign
The final step is to schedule your sequence.͏ This is where you can decide when and how often your emails march out to your prospects.
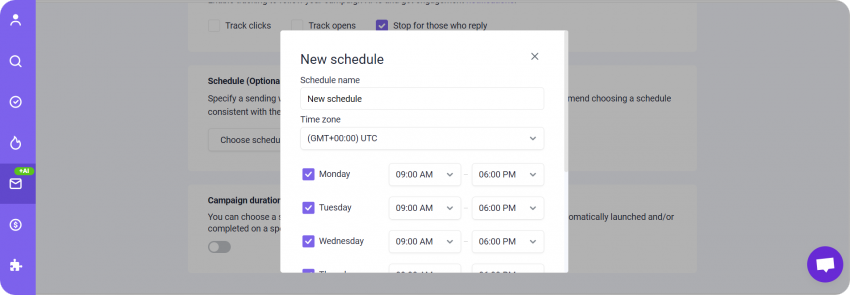
Click the “Schedule͏” button. You’ll see several options to customize your schedule according to your preferences and goals. For example, you can choose whether you want to start sending immediately or at a specific date and time. You can also decide whether you want to send emails only on weekdays or weekends or on specific days of the week or month.
You can also tune the time zone, the sending limit, and the sending interval for each email in your sequence.
Once you are done with scheduling your sequence, carefully review it and click the “Start” button in the bottom right corner of the editor. This will launch your sequence, sending emails to your prospects as per your schedule. Feel free to hit pause, edit, or delete your sequence anytime from the “Email Drip Campaigns” tab on the left sidebar.
And hey, monitor and measure the performance of your sequence in the “Statistics” tab on the left sidebar. There are various metrics such as Sent, Delivered, Opened, Clicked, Replied, Bounced, and Unsubscribed for each email in your sequence. You can also see the overall conversion rate and revenue generated by your sequence.
If you still think it’s too complicated, watch this short video tutorial – it will help you easily launch your first email campaign with Snov.io.
Wrapping up
Whether you’re using Gmail’s built-in features or professional email marketing services and tools, the ability to send emails to a crowd is still a big deal today, and it’s crucial to use it both effectively and ethically. Keep your messages on point, respectful, and a little protective of your recipients’ privacy – in other words, send wisely.
We hope that this article has helped you learn how to send individualized emails to multiple recipients using Gmail. If you have any questions or feedback, reach out to us or drop a comment below. Thank you for reading, and happy emailing!


